HTML5 Canvas - Creating a smiley face with the ARC API

In this article, I will share my experiment with HTML 5 canvas ARC API which I have been playing with to build basic compositions with circles and arcs.
First of all, to use the ARC API, you will need to have a very basic understanding of PI.
PI
In mathematics, PI is defined as a transendental number, that is the ratio of the circumference of a circle to its diameter. PI has an approximate value of 3.141 592 and is usually defined by this symbol π.
In HTML5 Canvas, PI is defined as MATH.PI
Read more about PI here
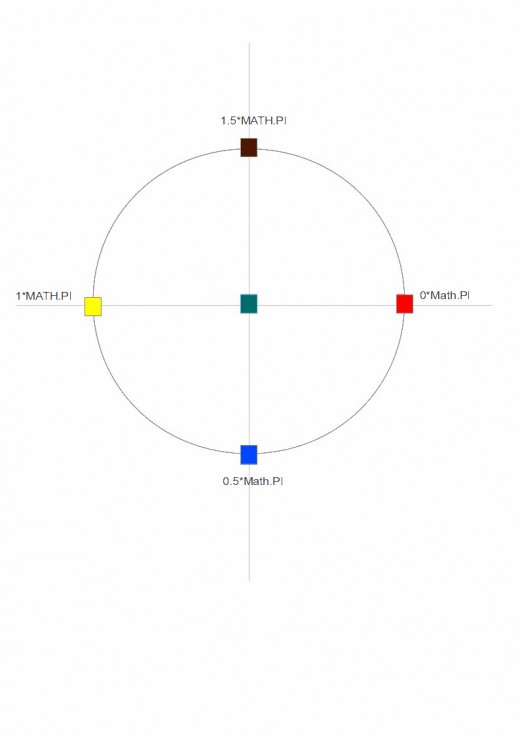
In mathematics, 2*PI will complete the full diameter of a circle. So if we divide a circle into 4 segments each segement will be equivalent to 0.5*PI
See the image below to visualise this
Starting your HTML 5 document
To begin with our HTML 5 experiment, first of all create a file called arc.html to whatever name you prefer in your project folder.
You will also need to include a jquery file somewhere in your project and call the jquery in your html document.
You can download the latest copy of jquery here
<!DOCTYPE html>
<html>
<head>
<title>Learning the basics of canvas</title>
<meta charset="utf-8">

<script type="text/javascript" src="jquery.js"></script>

<script type="text/javascript">
$(document).ready(function() {
   // arc api code will go here to create the shapes
});
</script>
</head>

<body>
<p>Canvas Experiment</p>
<canvas id="myCanvas" width="500" height="500" style="border:1px solid #EEE">
  <!-- // Fallback text -- >
  <p>Browser does not support canvas</p>
</canvas>
</body>
</html>
Ok from the code you will see its pretty much basic stuff. I have added the <head> section with a call to the jquery file and within the body i have added a DIV with id myCanvas which will where the shapes will be displayed.
The code itself for creating the shapes will sit inside $(document).ready() in the head of the html document.
So now lets look at creating our first shape.
I will start by creating the smiley face outline with a basic yellow circle.
$(document).ready(function() {
   var canvas = $("#myCanvas");
   var context = canvas.get(0).getContext("2d");

   context.strokeStyle = '#0000FF';
   context.fillStyle = '#FFFF00';
   context.lineWidth = 4;
   context.beginPath();
   context.arc(100,75,50,0*Math.PI,2*Math.PI,true);
   context.closePath();
   context.stroke();
   context.fill();
});
First we tell jquery which DIV to target to render the drawing. In this case we are setting the canvas as myCanvas DIV in the body. Then we set the context as 2D as this will be a 2D drawing.
Read more about html5 2D context here
Our circle shape has a few properties like, outline (stroke) colour, fill colour, radius and center co ordinates. We define these settings to construct the circle as explained below:
context.strokeStyle
This sets the stroke or outline colour of the circle. I have set it to Blue.
context.fillStyle
This is used to define the fill colour of the circle. In this case we have used the hexadecimal code for yellow.
context.lineWidth
This defines the stroke or outline border thickness.
context.beginPath
This is a method that clears any current drawing path to begin a path for a new drawing shape. This is used especially when we are building a composition with multiple objects. The script will need to know where a drawing stops and the next one begins
context.arc(100,75,50,0*MATH.PI,2*MATH.PI,true);
Now this is the core of the API which define the circle drawing itself.
The API is described below
context.arc(X,Y,Radius,beginAngle,endAngle,counterClockwise);
X is the X Coordinate of the circle centre point from the left edge of your canvas block. ao 100 will be 100px horizontal from the left border of the canvas block.
Y is the Y Coordinate of the circle centre point form the top edge of your canvas block. So 75 will be 75px vertical from the top border of the canvas block.
Radius is self explanatory. Radius of a circle is the distance from any point on the diameter to the centre of the circle.
beginAngle is where the drawing of the circle begins. In out case we are starting at 0*MATH.PI which is illustrated by the red box on the diagram above.
endAngle is where the drawing of the circle will stop. In our case we are doing a full circle so that will be 2*MATH.PI which means our drawing will end on the red. If we were to draw a half circle, we will begin on RED and end on Yellow which is 1*MATH.PI
counterClockwise
By default this value is FALSE, which means the drawing will be following a clockwise path, so bsically starting from RED going through BLUE then YELLOW, BROWN and back to RED. counterClockwise TRUE will start from RED to BROWN to YELLOW to BLUE and back to RED again.
closePath
This is used to make sure the shape is closed. On the full circle drawing this is not obvious, but if we were to draw half a circle then you can see the use of this method. Say for example i wanted to draw a half circle starting from RED to YELLOW Clockwise. If i dont use the closePath method you will only see the arc extending from RED to YELLOW clockwise. If i use the closePath method you will see the arc from RED to YELLOW plus a line connecting YELLOW to RED to fill the half circle.
Finally we apply the stoke and fill method which have properties defined at the beginning. The result will be the outline of the face that is a yellow circle with a Blue border.
Next we will create the arc that makes the smile. So your code should look like this:
$(document).ready(function() {
   var canvas = $("#myCanvas");
   var context = canvas.get(0).getContext("2d");

   // The face
   context.strokeStyle = '#0000FF';
   context.fillStyle = '#FFFF00';
   context.lineWidth = 4;
   context.beginPath();
   context.arc(100,75,50,0*Math.PI,2*Math.PI,true);
   context.closePath();
   context.stroke();
   context.fill();

   // The smile
   context.strokeStyle = '#FF0000';
   context.lineWidth = 2;
   context.beginPath();
   context.arc(100,65,40,0.2*Math.PI,0.8*Math.PI,false);
   //context.closePath();
   context.stroke();
   //context.fill();
});
Note in the smile section i have not used the closePath method. It has been commented out as we only need to display the arc.
Also note the 0.2*MATH.PI and 0.8*MATH.PI angles where the start and finish are defined.
The fill method is also not required here as there is no shape to fill. The arc is a part of a circle and the circle is defined to start at 100px left and 65 pixels from top. with a smaller radius of 40 px as the arc will need to sit inside the circle and therefore a smaller radius is required.
Now the drawing should look like this:
Finally we add the eyes to finish off the drawing. The eyes will be a simple task of adding to fill circles with smaller radius and at defined centre points on the circle.
So the code should now look like this:
$(document).ready(function() {
	var canvas = $("#myCanvas");
	var context = canvas.get(0).getContext("2d");

	// The Face
	context.strokeStyle = '#0000FF';
	context.fillStyle = '#FFFF00';
	context.lineWidth = 4;
	context.beginPath();
	context.arc(100,75,50,0*Math.PI,2*Math.PI,true);
	context.closePath();
	context.stroke();
	context.fill();


	// The Smile
	context.strokeStyle = '#FF0000';
	context.lineWidth = 2;
	context.beginPath();
	context.arc(100,65,40,0.2*Math.PI,0.8*Math.PI,false);
	//context.closePath();
	context.stroke();
        //context.fill();

	// The Left eye
	context.strokeStyle = '#000000';
	context.fillStyle = '#000000';
	context.beginPath();
	context.arc(80,60,10,0*Math.PI,2*Math.PI,false);
	context.closePath();
	context.stroke();
	context.fill();

	// The Right Eye
	context.strokeStyle = '#000000';
	context.fillStyle = '#000000';
	context.beginPath();
	context.arc(120,60,10,0*Math.PI,2*Math.PI,false);
	context.closePath();
	context.stroke();
	context.fill();

});
Now save your file and open in your browser to see the end result looking like this: